This guide handpicks concepts and presents them in the simplest ways possible so you have good clarity on what it is about. It helps you have a clear vision of how you could go about developing your product, the processes that go behind it, the technicalities involved, and more. So, this guide is extremely resourceful if you are:

Introduction

In 2026, many teams speed up labeling with model-assisted pre-labels (auto-boxes, auto-masks) and then use humans for verification, correction, and edge-case handling—often in an active learning loop to prioritize the most valuable samples. Promptable segmentation models (for example, SAM-style workflows) can accelerate mask creation, but strong QA is still required for long-tail classes and domain shift.
This buyer’s guide walks through annotation types, techniques, modern workflows, QA metrics, and a vendor checklist so you can scope projects accurately and avoid expensive relabeling.
What is Image Annotation?
Image annotation is the process of adding structured labels to images (and video frames) so machines can learn what’s in a scene and where it appears. These labels become ground truth used to train, validate, and benchmark computer vision systems.
Annotation quality depends on three things:
- A clear label taxonomy (classes + attributes + definitions)
- Consistent guidelines (edge cases, examples, what to ignore)
- Quality controls (review workflows, sampling, and acceptance criteria)
Common outcomes include: class labels (e.g., “defect / no defect”), object locations (boxes), pixel-accurate regions (masks), keypoints/landmarks, and tracking IDs across frames.
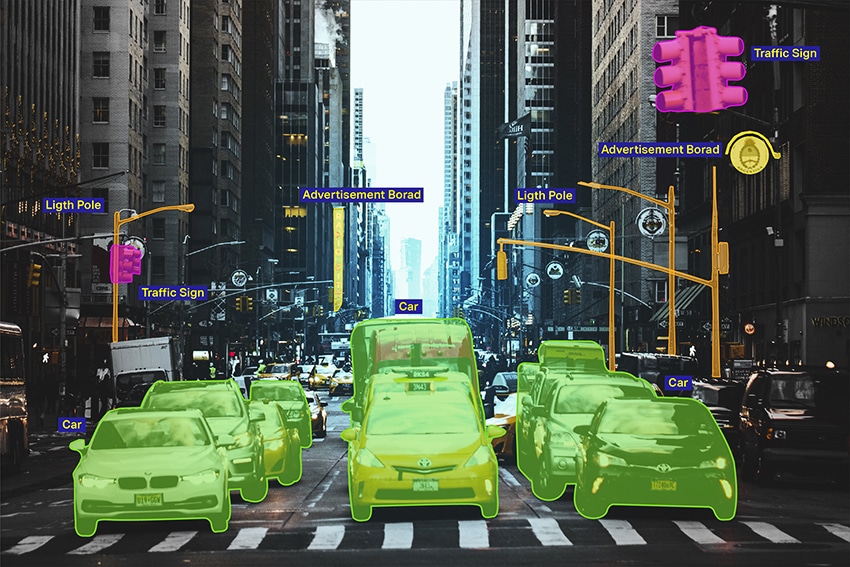

Image Classification

The most basic type, where objects are broadly classified. So, here, the process involves just identifying elements like vehicles, buildings, and traffic lights.
Object Detection
A slightly more specific function, where different objects are identified and annotated. Vehicles could be cars and taxis, buildings and skyscrapers, and lanes 1, 2, or more.
Image Segmentation

This goes into the specifics of every image. It involves adding info about an object, i.e, color, location, appearance, etc., to help machines differentiate. For instance, the vehicle in the center would be a yellow taxi in lane 2.
Object Tracking
This involves identifying an object’s details, such as location and other attributes across several frames in the same dataset. Footage from videos and surveillance cameras can be tracked for object movements and studying patterns.
Image Annotation Techniques
Image annotation is done through various techniques and processes. To get started with image annotation, one needs a software application that offers the specific features and functionalities, and tools required to annotate images based on project requirements.
For the uninitiated, there are several commercially available image annotation tools that let you modify them for your specific use case. There are also tools that are open source. However, if your requirements are niche and you feel the modules offered by commercial tools are too basic, you could get a custom image annotation tool developed for your project. This is, obviously, more expensive and time-consuming.
Regardless of the tool you build or subscribe to, there are certain image annotation techniques that are universal. Let’s look at what they are.
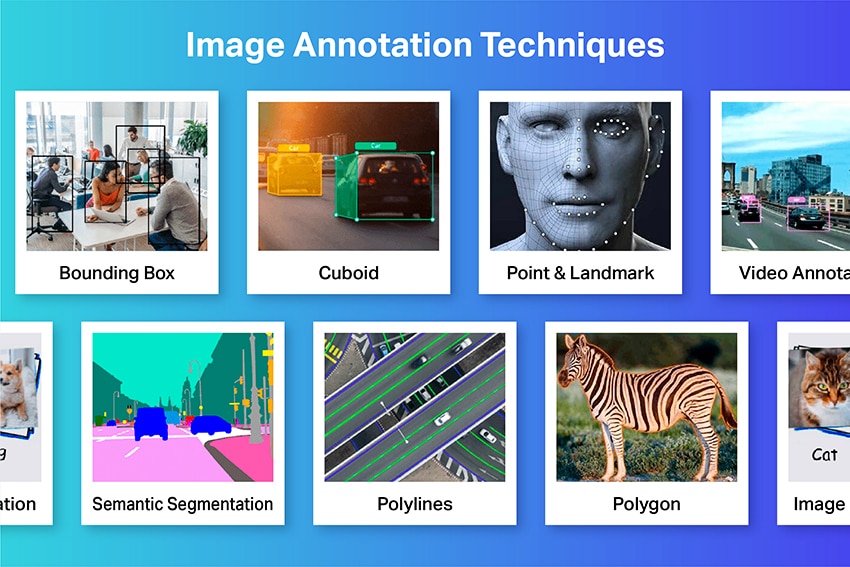
Bounding Boxes (Axis-Aligned, Rotated, and 3D Cuboids)
Bounding boxes are rectangles drawn around an object to show where it is. They’re the most common technique because they’re fast, scalable, and work well for detection models.
When to use bounding boxes
- You need object location, but not exact shape.
- Objects have clear boundaries and don’t require pixel precision.
- You want a cost-effective dataset for detection or counting.
Common use cases
- Retail shelf product detection
- Vehicle and pedestrian detection
- Equipment detection in industrial sites
- Damage detection (dent/scratch) when the approximate location is enough
Landmarking/Keypoints
Landmarking (keypoint annotation) marks specific points on an object—like corners, joints, or anatomical markers. It helps models understand pose, alignment, shape, and measurement.
When to use keypoints
- You need pose estimation (body/hand/face)
- You need precise alignment (corners/edges of objects)
- You’re measuring distances/angles (medical or industrial)
Common use cases
- Driver Monitoring: Eye corners, mouth points, head pose
- Healthcare Imaging: Anatomical landmarks for measurement
- Sports Analytics: Joint positions for motion analysis
- Manufacturing: Key corners/holes for part alignment and quality checks
Polygons/Masks (Pixel-Accurate Labels)
Polygons trace the outline of an object. They’re often converted into segmentation masks, which label the object at the pixel level. This is ideal when shape and boundaries matter.
When to use polygons/masks
- You need precise boundaries (not just a box)
- Objects are irregular (defects, organs, spills, foliage, damage)
- Small shape differences impact performance (fine-grained segmentation)
Common use cases
- Medical segmentation (organs, lesions)
- Industrial defects (cracks, corrosion, scratches)
- Background removal/product cutouts
- Agriculture (crop/weed regions), geospatial (buildings, water bodies)
Polylines (Lines)
Polylines are connected points used to label paths, edges, and thin structures that aren’t well represented by boxes or polygons. They’re ideal for things like lanes, borders, cracks, wires, or vessels.
When to use polylines
- The object is long and thin (a line-like structure)
- You care about direction, continuity, or curvature
- You’re mapping routes, boundaries, or networks
Common use cases
- Road lanes, curbs, and boundaries (ADAS/mapping)
- Cracks on surfaces (infrastructure inspection)
- Pipes/cables/wires in industrial imagery
- Blood vessels in medical imaging
- Rivers/roads in satellite imagery
Use Cases for Image Annotation
In this section, I will walk you through some of the most impactful and promising use cases of image annotation, ranging from security, safety, and healthcare to advanced use cases such as autonomous vehicles.
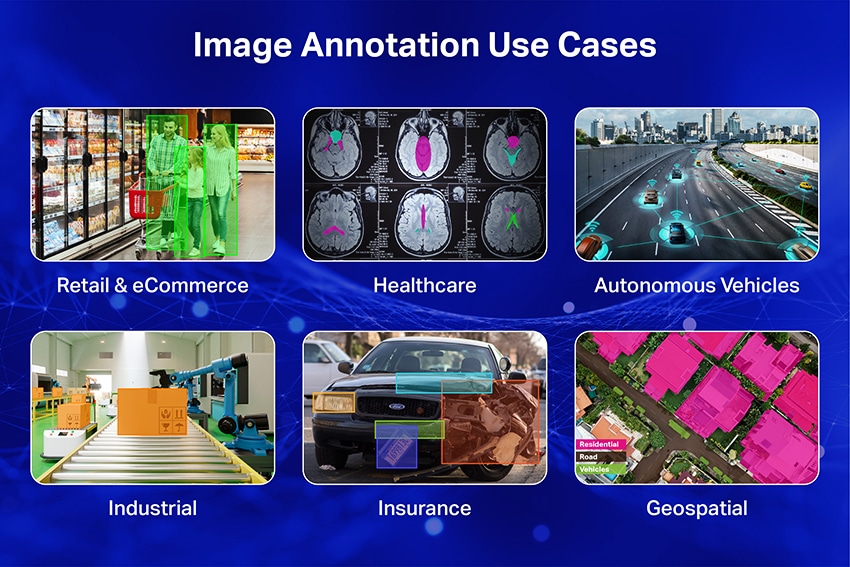
Retail & eCommerce Search (Product discovery, shelf analytics)
Goal: Help users find products visually (search, recommendations) and help retailers understand shelf conditions (availability, planogram compliance).
Best-fit annotation: Classification + Object Detection (sometimes Instance Segmentation for fine detail).
What you label:
- Product categories/brands/SKUs (taxonomy matters
- Bounding boxes for products on shelves (and optionally price tags)
- Attributes like “front-facing,” “occluded,” “damaged,” “out-of-stock gap”
Healthcare Imaging (Detection support, measurement, triage)
Goal: Support clinical workflows such as identifying regions of interest, measuring structures, or flagging cases for review (not replacing clinicians).
Best-fit annotation: Segmentation + Keypoints/Landmarks (sometimes classification).
What you label:
- Pixel-accurate masks for organs/lesions/structures
- Landmarks for measurements (e.g., key anatomical points)
- Attributes like “uncertain,” “artifact present,” “poor image quality”
Autonomous / Robotics (Scene understanding and safety)
Goal: Understand the environment to navigate safely—detect objects, interpret drivable space, and predict motion.
Best-fit annotation: Object Detection + Segmentation + Tracking (often multi-frame/video).
What you label:
- Vehicles/pedestrians/cyclists/signals/obstacles (boxes + attributes)
- Drivable area/lanes/sidewalks (masks + polylines)
- Tracking IDs over time (object persists across frames)
Industrial Inspection & Manufacturing (Defect detection and localization)
Goal: Detect and localize defects early to reduce scrap, rework, and warranty claims.
Best-fit annotation: Detection for coarse localization; Segmentation for irregular defects.
What you label:
- Defect regions (scratches, cracks, corrosion, dents, contamination)
- Defect type + severity attributes
- “Acceptable variation” vs true defect (very important in QA)
Insurance / Claims (Damage assessment support)
Goal: Speed up claims processing by identifying damaged areas and estimating severity, while assisting human adjusters.
Best-fit annotation: Detection + Segmentation (plus classification for severity).
What you label:
- Damaged components (bumper, door, windshield, roof)
- Damage regions (scratch/dent/crack) with masks or boxes
- Attributes: severity, part type, “multiple damages,” lighting/angle issues
Geospatial & Mapping (Feature extraction from aerial/satellite imagery)
Goal: Extract features for mapping, planning, agriculture, disaster response, and infrastructure monitoring.
Best-fit annotation: Polygons/Masks + Polylines (sometimes detection).
What you label:
- Building footprints, water bodies, land cover (polygons/masks)
- Roads, rivers, pipelines, boundaries (polylines)
- Attributes: road type, surface type, building type, “under construction”
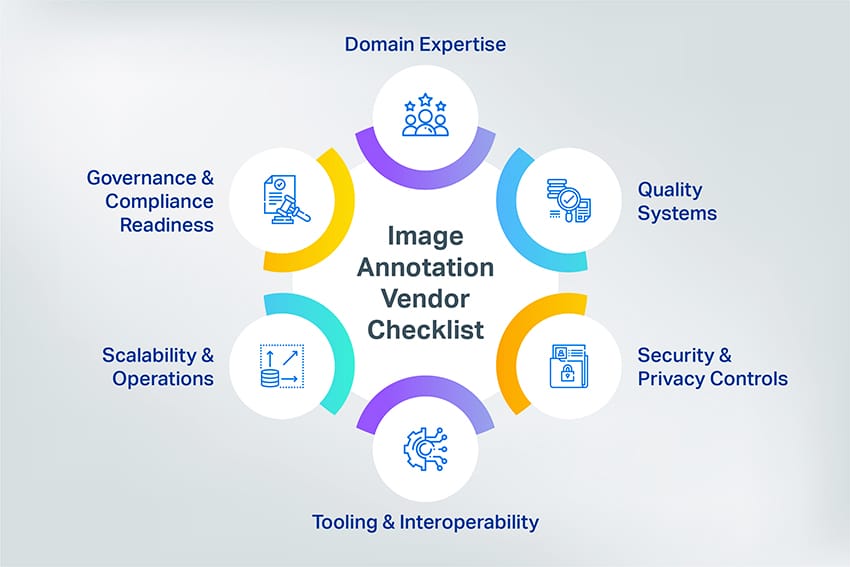
How to Choose the Right Image Annotation Vendor or Platform (Evaluation Checklist 2026)
When teams say they’re looking for “outsourcing,” they’re often choosing two things:
- An image annotation platform (the tool/workflow layer), and/or
- An image annotation vendor (the service team that executes labeling at scale).
Some companies buy a platform and run labeling in-house. Others hire a vendor who uses their own platform. Many choose a hybrid: you own the platform and guidelines; the vendor supplies trained annotators and QA operations.